Air Dry Clay -- Pinch Pots, Coil Pots, & Slab Looms
What is clay?
Clay is a heavy, sticky material from the earth that is made into different shapes and becomes hard when it is baked or dried.
Bible Integration:
"Yet you, Lord, are our Father. We are the clay, you are the potter; we are all the work of your hand" (Isaiah 64:8).
We are the work of the Lord's hands, just as the clay pot made by the potter is his work. We have been formed by the Lord, and we are dependent on Him to make us what He desires us to be.
Objectives:
You will experiment and explore the uses of materials and tools to create works of art and demonstrate safe and proper procedures for using materials, tools, and equipment. You will understand that people from different places and times have made art for a variety of reasons.
Materials:
air dry clay, water, clay tools (tongue depressors, old pencils, bottle caps, modeling/styling tool, etc.) tempera paint, liquitex gloss medium, gloss ceramic sealer, paintbrushes, containers, paper plates, black sharpies, laptop to watch videos
Vocabulary:
Look at these examples of pinch pot artifacts.
Clay is a heavy, sticky material from the earth that is made into different shapes and becomes hard when it is baked or dried.
Bible Integration:
"Yet you, Lord, are our Father. We are the clay, you are the potter; we are all the work of your hand" (Isaiah 64:8).
We are the work of the Lord's hands, just as the clay pot made by the potter is his work. We have been formed by the Lord, and we are dependent on Him to make us what He desires us to be.
Objectives:
You will experiment and explore the uses of materials and tools to create works of art and demonstrate safe and proper procedures for using materials, tools, and equipment. You will understand that people from different places and times have made art for a variety of reasons.
Materials:
air dry clay, water, clay tools (tongue depressors, old pencils, bottle caps, modeling/styling tool, etc.) tempera paint, liquitex gloss medium, gloss ceramic sealer, paintbrushes, containers, paper plates, black sharpies, laptop to watch videos
Vocabulary:
- 3D - An object that has height, width and depth
- ceramics - products made from clay and similar materials
- human-made - made by people
- medium - the materials that are used to create a work of art
- air-dry clay - clay which air-dries to a hard solid, no baking or firing needed
- sphere - a round solid figure
- pattern - the repetition of an element (or elements) in a work
- slip - a liquid form of clay used to fill in pores, even out the color, and join clay elements together
Look at these examples of pinch pot artifacts.
What do they have in common? How are they different? Which one do you like the best? Why?
Pinch Pot Instructions
Watch this video, How to Make a Pinch Pot:
- Get clay, and a paper plate. Write your name on the paper plate.
- Roll the clay into a ball/sphere. Hold the ball of clay with one hand and use your other thumb to press into the center until your thumb is about 1/4 to 1/2 inch from the bottom.
- Slowly widen the hole by pinching up the walls. Turn the piece continously as you pinch to keep the walls even in thickness.
- Continue working on the walls and molding the bowl. Make sure the bottom and the walls are at least 1/4 inch thick.
- Flatten the bottom by gently pressing the inside of the piece against a flat surface.
- Use a small amount of slip (water + clay) to smooth out any cracks that may have been created while pinching.
- Use the clay tools to create texture, or to draw into the surface of the clay.
- Write your initials on the bottom of your pinch pots.
- Raise your hand for a turn to dip your pinch pot in the mixture of 1/2 water and 1/2 liquitex gloss medium. Place it on the shelf to dry.
- Once dry, paint with tempera paint. When the paint is dry, spray with gloss ceramic sealer.
Coil Pot Instructions
- Watch the video, How to Make a Coil Pot and Coil Pot
- Get clay, and a paper plate. Write your name on the paper plate.
- Start with a ball/sphere of clay. Roll the ball of clay starting at the center and working your way out to form a cylinder. Keep rolling until it is in the shape of a rope or a snake. Be careful to keep the rope even in thickness and about 1/4 inch thick.
- When the rope is finished start with one end and spiral or coil the rope to form the bottom of the pot.
- Flatten the bottom by gently pressing it against a flat surface.
- Once the bottom is finished start to coil up to create the sides.
- Use your thumb and fingers to gently press the sides together and adjust the shape. Make sure the bottom is securely attached.
- You may use the clay tools to create texture, or to draw into the surface of the clay. Use a small amount of slip (water + clay) to smooth out any cracks that may have been created while pinching.
- Write your initials on the bottom of your pot.
- Raise your hand for a turn to dip your pinch pot in the mixture of 1/2 water and 1/2 liquitex gloss medium. Place it on the shelf to dry.
- Once dry, paint with tempera paint. When the paint is dry, spray with gloss ceramic sealer.
Slab Loom Instructions
- Start with a ball of clay. Using a rolling pin and some wood slats roll out a slab of clay.
- Compare the size of the slab to your Ball canning band. If you need to, add extra clay and place it overlapping onto the short edge. Roll smooth. (If needed, use a Popsicle stick to smooth out the seam where you add clay.)
- Use the Ball jar band and cut a nice clean circle in the middle of your clay. Make sure that your border around the cut out circle is at least the width of 2 fingers.
- Lift the center out. Smooth all edges with your finger and get rid of any rough spots. If its rough now, when its dry it will cut!
- Once the frame is smooth, decide on a design. You can use small objects to create texture. For example, use bottle lids to make circles. You can lay a piece of plastic wrap on the slap and lightly press down with the tip of a pencil to create a design. When done gently lift the plastic wrap off.
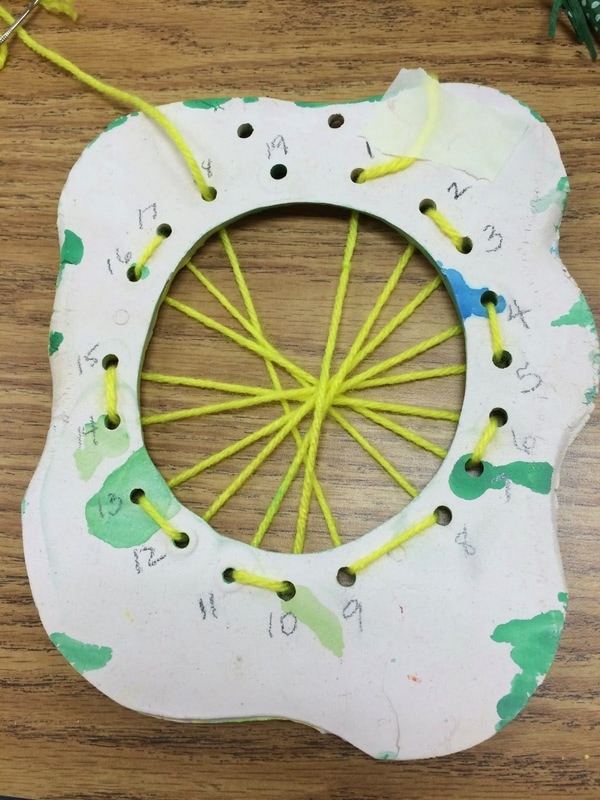
- Around the edge of the opening use a straw to make your holes for weaving. Use your finger to measure between holes. Make sure you have an odd number of holes (11 or 13).
- Let clay dry.
- Paint with tempera paint. When it is dry spray with acrylic sealer. Dry.
- On the back side number the holes.
- Thread the warp string as indicated above.
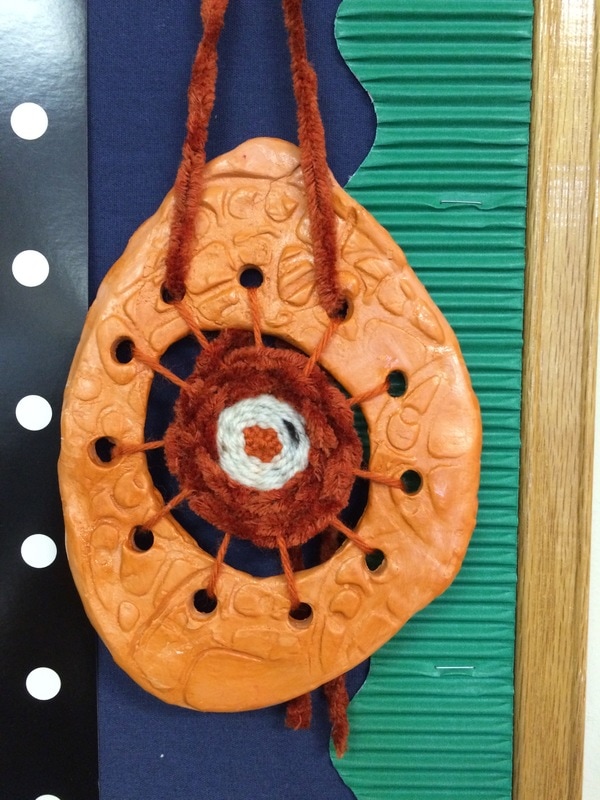
- After you finish, use the odd number thread from the front to begin weaving in the center. Weave over under in a circular direction. Here is an example:
- On an index card write your name and a 5 sentence paragraph on what's unique or special about your artwork and what it means to you.
Standards:
VA:Cr2.1
VA:Cr2.2
VA:Cn11.1
VA:Cr2.1
VA:Cr2.2
VA:Cn11.1


